Monday, June 25, 2012

a quick note about garlic scapes


Lately, I've been getting a lot of questions about garlic scapes. I've been using them a good amount lately since they're in season, and you can buy a ton of them at the farmer's market these days for basically nothing. For those of you who don't know the garlic scape, here is a brief introduction. Garlic scapes are the curling tops of garlic plants, which are just as edible as the bulb of garlic. They are incredibly flavorful, and while they don't look like garlic, they have a great, slightly more mild, garlic flavor. They are almost a mix between a green onion and garlic, and can be cooked similarly. I love throwing them into veggies that I'm cooking up or pasta. Many people make garlic scape pesto, but I haven't tried that yet. One thing is for sure, these babies are only around for a short season, so if you see them at the market, get them! They are versatile and so incredibly delicious. Below is a quick and easy recipe, to show you how easily they can be incorporated into any dish. In an upcoming pasta recipe, you'll see these scapes used again. It is certainly a veggie that is a little outside of the box, but it has amazing flavor and is worth the 60 cents you'll pay at the market, I promise!

Sauteed String Beans and Garlic Scapes, with Toasted Almonds

1 tsp olive oil
1 large handful of string beans, halved if they are large
3 garlic scapes, cut into 1-2 inch pieces
1/4 cup sliced almonds, toasted
salt and pepper to taste

delicious.

Heat 1 tsp of oil over medium heat
Saute the string beans and garlic scapes together over medium heat, until both start to brown slightly
Season with salt and pepper to taste, and toss in the toasted almonds. Give a quick toss, and cook for one more minute before serving
Enjoy!

beautiful scapes, with string beans.

And keep your eyes peeled for more garlic scape recipes to come!

a different kind of burger

It's officially summertime, and what is better to eat in the summer (other than ice cream) than burgers. There is something so unique about the method of grilling food that just can't be beat. I love grilling veggies, corn, burgers, even fruit! I absolutely love having a bar-b-que in my back yard at home, or going to grill in a local park in New York. Almost all parks in New York City, except for Central Park, have designated grill areas where you can bring your own portable grill (very cheap to purchase!), you should definitely check it out! Here are a few pictures of my friends and I grilling in a beautiful park in Morningside Heights. If you haven't grilled in the city, you should give it a try. It is so incredibly beautiful to spend an afternoon grilling and enjoying your friends' company.

corn and buns, on the grill
pineapple


But back to burgers. I love burgers. And I know, being a vegetarian can limit my burger options, but it also motivates me to try new recipes and make my own burgers. I absolutely LOVE veggie burgers and salmon burgers. You will definitely have a salmon burger recipe to read about up here soon, I promise. The great thing about veggie burgers is that you can make any type of burger you want. I've made pure veggie burgers, chickpea burgers, even portobello burgers, but one thing I've never made is a quinoa burger. So when one of my most fun and adventurous friends to cook with, who was coming over to cook the other night with my roommate and I, suggested we make quinoa burgers for dinner I leaped at the opportunity. Sometimes you just can't get outside to grill, but using fresh summer ingredients can still make your week night burger's something delicious.

The recipe below is based off of a recipe my friend found, but that we tweaked to work for us. I promise you, this are seriously delicious, and 100% gluten free and vegetarian. Plus, they have awesome flavor. The ingredients that go into these burgers jive so well when combined, that veggies and non-veggies alike will love these. They came together easily, and we made a delicious fresh salsa to top them off. You have got to try these!


burger, with a twist.

Qunioa Burgers and Orange Mango Avocado Salsa

1 cup cooked quinoa, cooled to room temperature
1/3 cup shredded cheese (whatever you like would be delicious here)
1/4 cup fat free cottage cheese
2 medium carrots, grated
1 patty pan (or summer) squash, grated
1 large egg
1 1/2 tbsp rice flour (or gf flour mix; regular all purpose flour would work here if you're not making the recipe gf)
1 green onions, diced
1/4 tsp agave nectar
1/4 tsp sea salt
1/4 tsp ground black pepper
1/4 tsp garlic powder
1/4 tsp cumin
2 tbsp fresh herbs, chopped (we used basil, mint, and oregano here)
1 lime, juiced
1 tbsp


Combine all ingredients into a large bowl and mix well
Heat 1 tbsp olive oil in a large frying pan, over medium heat on your stove
Using your hands, make a small-medium sized ball of quinoa, an flatten it until it is about 1/2 inch thick
Place the burger into the pan and press your thumb into the middle of the burger, just a little, to allow for even cooking
Cook on one side for 4 minutes, or until the side of the burger starts to brown, and then flip, cooking the burger on the other side for 4 minutes as well (a little longer if you really like them browned)
You should be able to make about 3 at a time in a pan (we had 2 pans going at once), and the recipe will make at least 8-10 burgers
Remove from the pan, top with your salsa, and enjoy!


2 riped avocados, diced
2 medium oranges, peeled and diced
1 large mango, peeled and diced
1 lime, juiced
1 tbsp fresh herbs, chopped (we used mint and basil here)
salt and pepper to taste

yum.

Combine all ingredients in a bowl and toss together until just mixed
Serve over your quinoa burgers, or on their own
Enjoy!


Wednesday, June 20, 2012

the best part of any meal

Okay everyone, let's be honest with ourselves. The best part of any meal, is dessert. You just can not tell me that you don't look forward to that something sweet at the end of every meal (oh please don't tell me that- it can't just be me)! As I've mentioned before, I have something of a sweet tooth. Yes, while I crave a salad for lunch on most days, and my afternoon apple is something I seriously look forward to, nothing hits the spot like some good ooey gooey chocolate, peanut butter, sugary treat. Eating dessert honestly makes me happier than a lot of other things --the smile that spreads across my face as I bite into the first forkful of cake, or first spoonful of ice cream is a mile wide.

And thus, since I aim to make my friends and family happy as well, I often find myself filling their belly's with delectable baked goods too (plus, if I ate all of everything I made, we would have a serious problem on our hands). As I've said before, when having a meal with friends, I typically take on the challenge of dessert. Last weekend I was having dinner at a friend's house. Everyone was bringing a few things to add to our Friday night dinner. As my boyfriend likes to tease me about, I can never make just one thing -I always have to bring two. I don't know what it is, but I hate coming with just one dessert, one salad, whatever it may be. After volunteering for the dessert course, I realized that there were still other things I wanted to make, so I also offered to make a grain of some sort. My rice dish turned out beautifully, and I've included the recipe below as I promised my friend I would, but in my opinion, the dessert was truly the best (elevated by the fact that I also brought fresh grapes- yum!)

This recipe was truly inspired by thinking about what ingredients I had in my kitchen, and how I could throw them into one delicious bite. When I'm short on time, and want big flavor, I often turn to making bar cookies, blondies, or brownies. Baking this way saves you the time of scooping out each individual cookie, and baking in batches (if like me, you always make more than a dozen cookies...if anyone would like to buy me a larger oven, that would be superb)! Not only were these bars easy to make, they were SO good. The best part about them? Other than the chocolate, they are pretty healthy. They could definitely be made into snack bars by removing the top chocolate layer (but really, would you want to do that?). Try them out yourself, and add in any type of nut or chip that you would like. I promise, you won't be disappointed.


 Chocolate Chip Peanut Butter Oatmeal Squares

1/2 cup brown sugar
3/4 cup chunky peanut butter
1/4 cup natural cinnamon apple sauce
1 tbsp vanilla extract
1 cup gluten free flour mix (you could use regular flour here, or whole wheat flour!)
1 cup rolled oats (I used gf oats- make sure if you are baking these gf, you double check that your bag is marked gf)
1 tsp baking soda
1/4 tsp salt
1 tsp cinnamon
1/2 cup vanilla almond milk (I was making these non-dairy, but regular milk would be fine here)1 cup dark chocolate chips


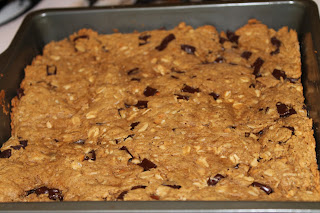
everything yummy, rolled into one
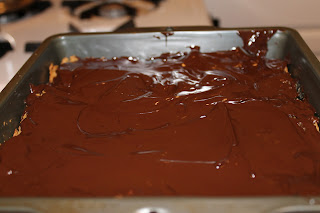
...and topped with chocolate
Preheat your oven to 350 degrees
In a bowl mix the peanut butter and sugar on high with your electric mixer until combined and fluffy (about 2 minutes)
Add in the vanilla extract and apple sauce and mix until combined
Add the flour, oats, salt, cinnamon, and baking soda into the peanut butter mixture slowly on medium speed
At this point the dough will start to look crumbly and clumpy
Add the milk into the dough and mix until just combined
Fold 1/3 of the chocolate chips into the batter using a spatula
Transfer the dough into a greased 8x8 inch baking dish and spread evenly, pressing the dough down with the spatula
Bake for about 18 minutes or until the dough begins to set and the top begins to brown
Turn off the oven, and top the squares with the remaining chocolate chips
Place the dish back into the oven (with the heat off) and let it sit for about 5-7 minutes, or until the chips start to melt
Pull the dish out and spread the chocolate over the top of the bars
Allow chocolate to cool and set. As soon as it is set, cut into bars and serve!
Enjoy!


Lemon Dill Wild Rice

2 cups of wild rice (I used a blend that had white, brown, purple, and black rice)
1 small handful of fresh dill leaves (remove from stem)
1 medium lemon
2 cups cherry or grape tomatoes, halved
1 yellow summer squash, cut into 1 inch matchsticks
1/4 tsp cumin
1/4 tsp garlic powder
salt and pepper to taste


In a large sauce pan, toast up your rice on medium heat for about 2 minutes
Add 4 cups of water and bring the rice down to a simmer, covering and allowing to cook covered for around 25 minutes or so (or until the rice is fluffy, but still a little nutty)
Season the rice with cumin, garlic, salt and pepper
Zest 1/2 of the lemon into the rice, and juice 1/2 of the lemon into the rice as well
Add the tomatoes and squash to the rice and stir to combine
enjoy!

Tuesday, June 19, 2012

quick and easy

Sometimes, after a long day at work, you want something quick but delicious to throw together for dinner. I'm a big fan of big flavors and fresh ingredients, so I try to avoid frozen or pre-packaged meals when possible. But, I understand the difficulty that many post-college 20 somethings have, trying to make quick, healthy meals for one or two, and living on their own for the first time (and let's be honest, many families don't have the time either after long work and school days). I have a few go-to recipes for these types of days. I try to stock my fridge and pantry with ingredients that are easy to use, and versatile for long days when I need to pull dinner together with little effort. By taking advantage of the ingredients that I always keep on hand, and combining them with whatever fresh produce that I happen to have in my fridge, I can usually turn out a good meal in under 20 minutes. I know that it is definitely something that many people my age (and in general), have difficulty with, so I hope that this post, and others found here on my blog, will inspire you to take the extra five minutes to cook something fresh, rather than defrost something frozen. Many of the dishes that I make for dinner are easy to put together, and don't have an excess of unnecessary ingredients (those things that you buy from the supermarket, use once, and then sit in your fridge). Following the vein of eating local, eating fresh is great for you, your body, and the world around you. Next time you go to grab for a lean cuisine, or even an Amy's frozen meal, try going the extra step, and using your stove instead of your microwave.

One of my best friend's little sisters is in the city for the summer. She is an aspiring film maker, with two awesome internships for the next few months. She also happens to be living in an NYU dorm around the corner from me --please, be more convenient. The other night she came over for dinner, and after a long day at work I wanted to make something tasty and filling, that would not be a totally time consuming dinner. One of my favorite go-to meals is anything Asian inspired. Stir fry, be it with veggies, tofu, or edamame, combined with some good asiany sauce is always easily pulled together, and I just love me some Asian noodles. When my friend came over, I decided to make sesame peanut noodles, one of my absolute favorites. With some fresh veggies thrown in, and a delicious side of steamed greens, this meal was quick, simple, and incredibly delicious. Definitely try it out for yourself, and impress your guests (and your taste buds) in no time; I promise the extra few minutes are worth it.

dinner in under 20? yes please!

Sesame Peanut Noodles with Sesame Rainbow Chard


6 oz (3 servings, or 1 medium handful) brown rice spaghetti (or whole wheat pasta will work here; these noodles will hold up better to the sauce than regular Asian rice noodles)
1 tsp sesame oil
1 tsp minced garlic
1/4 cup chunky peanut butter
1 tbsp lime juice
1 tbsp warm water (more depending on how you like the consistency of your sauce)
1 tbsp toasted sesame seeds
2 large carrots, cut into matchsticks
1 yellow or orange bell pepper, cut into matchsticks
3 chives or 1 green onion, chopped

Bring a pot of water to boil on your stove, and cook the noodles as per the instructions on the box. Be sure that the noodles are slightly al dente
Drain the noodles and rinse with cool water, allowing them to come to room temperature
In a bowl, whisk together oil, garlic, peanut butter, lime juice, and water until they are well combined into a sauce. Add more water as needed depending on how you like the thickness of your sauce
Whisk in the sesame seeds to the sauce
Toss the noodles, carrot, and pepper in the noodles
Top with chive and enjoy!


1 large head of rainbow swiss chard
1 tsp sesame oil
a sprinkle of sesame seeds

Chop the chard (leaves and stems) into bite size pieces
Place in a shallow sauce pan over medium heat with a splash of water and a splash of sesame oil
Cover the pan and allow the chard to steam until it just begins to turn limp
Sprinkle with sesame seeds and enjoy!


Tuesday, June 12, 2012

for the love of baking

Whenever we have people over our apartment for dinner, or I go to someone else's apartment, I almost always, without fail, volunteer myself to bring dessert. I suppose there are a few reasons why I do this. First of all, I simply love to bake. Cooking relaxes me at the end of a long day, but baking provides a challenge for me. I've had to learn (the hard way) that there is a reason why exact measurements are necessary when baking. When I cook, I can typically throw things together, measuring by the sight, smell, and taste of my ingredients. As I cook, I always continue to taste along the way, so that the flavors get layered correctly. Baking on the other hand, is more of an exact science. But, the reward that comes from serving anyone good food (whether baked or cooked), is totally outstanding for me. I love when people try my food, and not only do they like it, but the experience of eating it makes them smile. Often people will volunteer to pick up desserts for a dinner, and while there are seriously a TON of amazing bakeries in New York, there is something special about putting a little extra love into what you bring to dinner.

Another, more selfish reason I suppose, is that I like to bring things that I can eat. For the most part, store bought (even bakery bought) gluten free desserts are just okay. When I bake (for the most part) I know that I'll be bringing something just a little bit more delicious to the table. I don't like burdening other people with the responsibility of finding a good gluten free dessert, or eating a bad one. Plus, it is incredibly rewarding to hear that a dessert is good from someone who is not gluten free. I also just love dessert. Is there anything wrong with that? That is probably the simple and best reason. I love the smell of baking in my apartment, I love nibbling on spare chocolate chips, and I love adding recipes to my baking repertoire.

The other night, we were having a bunch of friends over for dinner. Everyone was bringing something, but my roommate, boyfriend and I volunteered to make most of the dishes (we love cooking! I know, totally strange). We made a delicious dinner, which was followed by, in my opinion, an amazing dessert. I tried out a new recipe and I think it came out deliciously. You all know my devotion to pumpkin, and of course, it popped up in this recipe as well. It was the perfect combo of chocolate and non-chocolate dessert, all swirled into one delicious square.


swirled delicious

Pumpkin Swirl Brownies

8 tbsp unsalted butter
6 oz bittersweet chocolate, chopped
2 cups gf flour mix (or regular flour)
1 tsp baking powder
1 tsp salt
1 3/4 cups sugar
4 large eggs
1 tbsp vanilla extract
1 1/4 cups pumpkin (pure pack, not pumpkin pie filling)
1/4 cup canola oil
1 tsp cinnamon
1 tsp nutmeg
pumpkin...chocolate
delicious layers
Preheat your oven to 350 degrees
Line a 9x9 baking dish with parchment paper, and line the paper with non-stick cooking spray as well
Melt the chocolate and butter over a double broiler (a heatproof bowl set over a sauce pan of simmering water) on your stove, stirring until completely melted and smooth
In a medium bowl, whisk together the flour, baking powder, and salt
With your electric mixer, mix together the sugar, eggs, and vanilla, beating until light and fluffy (around 4 minutes)
Once combined, slowly add in the flour mixture while continuing to beat the batter
Pour half of the batter into a separate bowl, and mix in the chocolate mixture, stirring to combine well
Add the pumpkin, oil, cinnamon, and nutmeg to the other half of the batter
Pour half of the chocolate batter into the prepared pan and spread out evenly and smoothly
Pour half of the pumpkin batter on top of the chocolate layer, spreading carefully with a rubber spatula
Repeat once more with the chocolate and pumpkin. You should end up with 4 layers
With a knife, swirl the two batters together. Place the knife all the way into the bottom of the pan, and gently swirl the batter to create a marbled effect
Bake for 40 minutes or until set. Cool and cut into squares. Enjoy!


the perfect end to any meal.

Sunday, June 10, 2012

the perfect kale salad

Speaking of eating local, there are some really great farm to table restaurants in New York. These restaurants either grow their own food on their own farms (typically upstate, but not always- roof top farming is becoming quite popular these days in big cities!), or partner with small local farms, bakeries, breweries, etc., in order to get their food. While these restaurants are small in number, they are big in taste. Like I've said before (and repeated multiple times in the post above), eating local, fresh ingredients can't be beat.

One of my favorite farm to table restaurants in the city is called Northern Spy, in the East Village. They do amazing lunch, dinner, and brunch. All of their food is seriously outstanding, with a menu built around "seasonality and quality", they use locally grown, raised, caught, and crafted products. They work closely with those who provide them food, and their efforts are greatly rewarded in the quality of their dishes. My friends and I have had many a meal here, especially brunch. While their biscuits with home-made apple butter are seriously out of this world, my favorite thing to get here is the Kale salad (and with brunch, I get it with two eggs on top). I know what you might be thinking, Kale salad? And I know, I'm a pretty over zealous fan of kale, however, this salad is really amazing. It is one of the first kale dishes that truly turned me on to the beauty of this vegetable. During the winter the salad has squash, but during the summer it is replaced by sweet potato. Either way, the salad is amazing, and every time my friends and I go, we discuss how awesome it would be to make it at home. So we did. Check out our version of the most amazing kale salad ever. While it doesn't exactly stack up to the perfection at Northern Spy, we got pretty close, and nothing was left at the bottom of our bowls when we were finished.

The Perfect Kale Salad

1 medium sweet potato, cubed into 1/4 inch cubes
1 tsp olive oil
salt and pepper to taste
1 large head of kale, with the leaves removed from the stems and shredded
1/3 cup roasted whole almonds (we cut them so they ended up being halves and thirds of almonds)
1/3 cup pecorino cheese (any yummy cheese of your choosing would be great here), cubed into 1/4 inch cubes
1 good splash of lemon juice
1 good splash white balsamic
1 small splash olive oil

local
fresh
delicious
Preheat your oven to 400 degrees
On a baking sheet lined with tin foil, toss the sweet potato with salt and pepper, before putting in the oven and baking for around 30 minute or until the potato starts to caramelize. Toss the cubes once about halfway through roasting
Place the Kale in a bowl and dress with lemon juice, white balsamic, and olive oil. Massage the dressing into the Kale for about 30 seconds
Add the cheese and nuts into the salad, adding the sweet potato last after it is cooled
Toss to combine, and enjoy!

yum.

buying and cooking local

If you hadn't noticed by now, I love cooking seasonally. Not only are ingredients fresher, better tasting, and readily available, but by cooking seasonally, you can also do your best to eat local. It can be very hard when eating out, to guarantee that you are eating local. While more and more restaurants these days cook with local ingredients, and adjust their menus for the season, it is still a slow growing trend, even here in New York. Check out the green market website here to learn more about buying and cooking local. You can read all about why buying local is not only awesome, it is delicious, good for you, good for farms, and good for the city. The website elaborates on each reason, but below is their top 10 reasons to buy local food. Definitely check it out, some might surprise you!

10 Reasons to Buy Local Food

1. Local food tastes better
2. Local produce is better for you
3. Local food preserves genetic diversity
4. Local food is safe
5. Local food supports local families
6. Local food builds community
7. Local food preserves open space
8. Local food keeps taxes down
9. Local food benefits the environment and wildlife
10. Local food is an investment in the future


All sorts of yummy foods are in season right now. I promise to have a green market post soon- and, if you live in New York, and you don't shop at the green market, you're missing out! They are in every neighborhood in the city, so check out their website if you're not sure where the closest one to you is. The colors of the veggies and fruits right now are just amazing, and their taste is even better. For example, garlic scapes. If you don't know them, get to know them! They are the curly top of garlic plants, which are just as edible as garlic. They have a slightly milder flavor, almost in between a scallion and garlic.

When one of my wonderful friends came over this week to cook dinner with me, we used some delicious green market veggies, that we had each picked up last weekend. We both love the market, and often run into each other there on Saturdays. We often cook together, and always make delicious dinners. This week's meal was inspired by the market, and brought to you by local farmers. The fresh ingredients, purchased from the market, give the dish amazing flavor and brightness. I promise, you won't be missing your marinara sauce here; this is a different kind of pasta, and it is delicious.

Farmer's Market Summer Pasta

beautiful, just in time for summer.
1 tbsp olive oil
1 medium handful brown rice (or whole wheat) spaghetti
1/2 a shallot, chopped
2 garlic scapes, cut into inch long pieces
1 yellow summer squash, cut into thin strips
3 large carrots, shredded with a vegetable peeler
2 cups of raw kale, cut or torn into bite size pieces
2 large sprigs of Rosemary
1 medium lemon
1/8 cup white wine
Sea salt and pepper to taste


Bring a large pot of water to boil over medium heat on your stove, before adding in the spaghetti
Cook spaghetti until aldente and drain
While your pasta is cooking, heat olive oil in a pan over medium heat
Add in shallots, and cook for a few minutes until they begin to turn translucent
Next, add in the garlic scapes and cook for two minutes before adding the yellow summer squash
Add in the carrot, and last the kale
Remove the leaves of the rosemary from the stem, and add to your pan as well
Add a good splash of white wine to the pan, and the juice of one whole lemon
After the liquid cooks down, add the drained spaghetti to the pot as well
Season the pasta with sea salt and pepper, to taste, and enjoy!

thanks to my favorite farmers


Tuesday, June 5, 2012

cookies for my bubbe

There is something about spending time with my family that is just so wonderful, it is hard to put into words. Something about the comfort of being with the people who know you best, the happiness of hanging out with people who know just how to make you laugh, and the absurdity and silliness that inevitably define a family gathering; these things are so special. I am very lucky to have a wonderful family, including my parents, sister, grandparents, cousins, aunts and uncles. Everyone is totally silly, crazy and wonderful in their own ways, and I love being around them. Though we are all spread out throughout the country, when coming together on holidays, family events, or vacation, we always have a great time.

Last weekend, I flew down to Florida, where I met my mom, dad, and sister at my grandparents house. My Bubbe and Poppop live on a beautiful little island off the Southwest coast of Florida called Sanibel. If you've never heard of Sanibel Island (which chances are, you haven't), I highly recommend you check it out. It is a tiny island, where the majority of the land is conservation land, meaning no one can build on the land. So basically, this means that there are no street lights, no traffic lights, no high-rise buildings, lots of beautiful lush greenery, and lots of cool animals roaming around (seriously, there are alligators in the lagoon behind my grandparents' house). At night, you can see the stars, and during the day relaxation flows through the island. My grandparents have been going down to Sanibel for over 20 years, and so have I.

the beautiful sanibel

My Bubbe and Poppop are moving, so we spent the weekend going through their house, remembering old memories, and laughing at some of the silly things we found lurking in cabinets and closets. Though the purpose of the trip was to get packing done, it was still a great weekend. My grandparents are wonderful people, amazingly active, and always so happy to have us visit. My mom and I cooked a few delicious dinners for all of us, which we enjoyed over discussion of family history, current events, and everything in between.

My sister and I decided to bake cookies one night, and we knew exactly what our cookies needed to have in them: peanut butter and chocolate. Peanut butter and chocolate are my Bubbe's two favorites (my sister's as well). We threw together an easy and delicious batter and as the cookies baked, their house filled with an amazing aroma. After dinner everyone enjoyed the cookies (okay, and before too- my poppop had one before and one after dinner), but what I enjoyed most was making my grandparents happy. If you are as fortunate as I am to have such amazing Bubbes, Poppops, Nannas, Zeydehs, Mumums, Grandpas (or whatever you might have), as me, let them know how much you love them. Sometimes the coolest people in our lives are those who have experienced the most in their lives. These cookies are for my Bubbe, and I'd gladly make them again for her any day.


Chocolate Peanut Butter, Peanut Butter Cup Cookies


YUM.

3/4 cup gf flour mix (or all purpose flour will work here)
2 tbsp cocoa powder
1/4 tsp baking powder
1/4 tsp salt
3 tbsp unsalted butter, softened
1/8 cup (plus a little extra for good measure) creamy peanut butter
1/4 cup sugar
1/4 cup brown sugar
1/2 one large egg (confusing, I know- crack the egg, beat it, and use half of that)
1 tsp vanilla extract
1 tbsp milk
1 cup chopped frozen peanut butter cups
1/4 cup dark chocolate chips

my sister gives the thumbs up
Preheat your oven to 350 degrees
In a medium mixing bowl, mix together your flour, cocoa powder, baking soda, and salt
In a separate bowl beat together the butter, peanut butter, sugar, and brown sugar until they start to cream and become light and fluffy (this should take about 1-2 minutes with a mixer, 4 or so minutes by hand)
Into the bowl with the sugars and butter, mix in the egg, vanilla extract, and milk, blending until smooth
Add in the dry ingredients, mixing until just incorporated
Fold in the chocolate chips and the majority of the peanut butter cups (saving a small handful to top the cookies with)
Onto a baking sheet lined with parchment paper, drop rounds of dough onto the sheet, spacing about 2 inches apart (they will expand a bit); there should be about a dozen good sized cookies
Before placing into the oven, press a few pieces of peanut butter cups into the top of each ball of dough
Bake the cookies for about 12 minutes and allow to cool on the baking sheet for about 8 minutes before finishing the cooling process on a wire rack
Enjoy!

cookies...
and paradise.

Sunday, June 3, 2012

a summertime fiesta

Nothing beats using fresh, delicious ingredients, which is something you can do any time of the year.  However, the time when late spring rolls into lazy summer days, is when, in my opinion, the most amazing produce becomes available. It is simply impossible not to get inspired by the bright rainbows of heirloom tomatoes, the sunny yellows of sweet corn kernels, and the vibrant reds of sweet summer strawberries. While I love cooking all year round, and using fresh local ingredients is my preferred way to go, summer produce can not be beat. I try incorporate as many fresh ingredients as possible during these months, when their flavors are simply at their best.

A lot of great summer meals can be created with limited stove top interaction, which is important when you live in a small Manhattan apartment. Not only can we all spare a little extra heat warming up our kitchens, but by leaving ingredients in a form close to their natural form, the amazing summer flavors really become the stars of these dishes. Cooking often elevates or changes different flavors, but when you've got such amazing fresh summer produce, that is so incredibly sweet, why mess with perfection?

One of my favorite summer meals that my boyfriend and I like to cook together is fish tacos. Now I know, sometimes fish tacos get a bad wrap. They can be a little smelly, and often people don't jump right to fish when filling their tacos. But let me tell you, they make a delicious summer meal. A taco is the perfect way to showcase fresh ingredients. On taco night, everyone can build their taco just to their liking, and when you provide great toppings, sometimes you can't even fit everything you want into your taco. The other night we made awesome fish tacos with corn tortillas. They were out of this world, and so easy to prepare. We used cod this time, however any white flaky wish will work deliciously--flounder and tilapia are great too. Get creative with the tacos, and remember- less cooking is more here. Use your stove quickly cook the fish (white flaky fish cooks in minutes), and let the ingredients sing for themselves.

the perfect bite of summer.
Fish Tacos

1/2 shallot, diced
1/2 cup cherry or grape tomatoes, halved
1/2 orange or yellow bell pepper, diced
fresh herbs of your choosing, finely chopped (we used dill, basil, oregano, and chive)
2 small limes
2 large ears of sweet yellow corn
2 small portions of cod (or any other white flaky fish)
4 corn tortillas
1/4 cup guacamole
2 oz cojita cheese, crumbled
1/4 tsp paprika
1/4 tsp cumin
1/4 tsp garlic powder
salt and pepper to taste

Place the tomatoes, shallot, pepper, and herbs into a medium mixing bowl
Juice 1 1/2 limes into the vegetables
Season with salt and pepper, and mix, cover, and set aside for 30 minutes

Preheat your oven to 350 degrees
After removing the husk, wrap each ear of corn in a piece of tin foil, seasoning with spices if desired, and place in the oven for about 30 minutes
When the corn is done, remove from the tin foil and allow to cool slightly
Enjoy on the side of your taco on the cob, or take it off the cob and add it to the taco!

Season both sides of the cod with paprika, cumin, garlic powder, salt and pepper, finishing off with the juice of the remaining 1/2 lime
Place the two pieces of fish into a pan sprayed with non-stick cooking spray, and cook until the fish becomes white and opaque (should be no more than 5 minutes)

If desired, warm your tortillas in the same pan that you used for the fish
Once they've reached your desired temperature, assemble your taco and enjoy!
(Oh, and cut up some fresh strawberries for dessert!)
fresh, at it's best.