Showing posts with label gluten free. Show all posts

Tuesday, September 4, 2012

not your mama's potato salad

It may not come as much of a surprise, but I don't really like mayonnaise. There's something about it's smell, texture, and taste that just doesn't do it for me. When making a dressing, a salad, or a sandwich, I am always looking for a good alternative for mayo. I love using mustard, instead of the traditional mayo--another good substitute is Greek yogurt. I love taking traditional dishes, that are known for being heavy or not incredibly flavorful and recreating them. By being a bit creative and thinking just a little bit outside the jar, you can really make some yummy dishes.

As I've mentioned before, one of the people I love cooking with the most is my mom. She is an incredible cook and when we work side by side we create culinary harmony. Whenever I am home, we always cook up a storm. I love taking advantage of my beautiful large kitchen at home (sorry apartment), and the fresh ingredient that we always have. Thanks to my garden, we are always fully stocked with delicious and fresh veggies, fruit, and herbs. Last weekend, I was home, spending the weekend with my family before my sister went back to school. My mom and I, up to our usual tricks, spent a large amount of the weekend in the kitchen. This post (and a few more to come) are all recipes from the weekend- so keep your eyes out for delicious mommy-daughter recipes coming your way!

My mom also loves getting creative in the kitchen and putting her own spin on recipes. When she introduced me to this incredible potato salad, I had to eat it to believe it. We had a huge bar-b-que on Saturday night, and what goes better with a summer bbq than potato salad? Now, I am not a huge fan of the traditional mayo-y potato salad, but this one really takes potato salad to a whole new level of gourmet. Thanks to my mom (and a little help from Ina Garten), I can now say I like potato salad--at least this one! Summer is rolling to a close, but there are still a few warm days left for bbq's and potato salad on the side. Try out this twist on an old classic, I promise you'll love it!

Fresh Herbed Potato Salad

2 lb small red or white boiling potatoes
3 tbsp dry white wine
3 tbsp white wine vinegar
1/2 tsp dijon mustard
1 tsp sea salt
1 tsp pepper
8 tbsp olive oil
8 tbsp chopped herbs of your choice (we used basil, parsley, chive, rosemary, and thyme)

lil potatoes
freshly picked, beautiful herbs
 Bring a large pot of water to boil and cook the potatoes for about 25 minutes, or until they are just cooked through
Drain the potatoes and place in a bowl, with a towel over the top, allowing to steam for 10 minutes
Cut the potatoes into halves or quarters (bite sized) and place in a bowl
Toss the potatoes with the white wine and allow the wine to soak in for at least 10 minutes
Combine the vinegar, mustard, salt, and pepper, and slowly whisk in the olive oil
Add the vinaigrette to the potatoes
Add the herbs to the potatoes and toss
Serve at room temperature and enjoy!

yum.


Sunday, July 29, 2012

handling the heat wave

If you hadn't noticed, lately I've been very into making "no-bake" recipes. I know it sounds a little crazy, but for someone who is as baking crazed as I am, the summertime can be hard. Not only is it totally treacherous to stand in front of my 350 degree oven as it wafts hot air in my direction, but the heat totally messes with ingredients as well.  When baking blondies a few weeks ago, they became chocolate swirl blondies instead of chocolate chip blondies because the chips were melted into the batter even before they went into the oven! Overheating and cooling can be problematic when baking in the summer, plus sometimes it is just plain uncomfortable.

That being said, I'd never let a little 93 degree heat wave come between me and my dessert creations. While it might be hot, I still want to make delicious things, and I know you guys do too. I came up with this recipe after seeing similar recipes popping up on other food blogs. They looked delicious, and I'm a sucker for anything with chocolate and peanut butter. Plus, these are naturally gluten free, which is something that can be hard to come by. Best of all, they're no bake, thus continuing my quest for cooler baking experiences in my little kitchen.

These cookies had a 2 fold purpose: first, I made them to bring in and share with my co-workers for a birthday celebration. They went over incredibly well, and since you can make many in a batch, the other half of these bad boys were supposed to go camping with me this weekend. While camping didn't happen (hello?! did you see the weather forecast?), and I was super bummed not to get to make smores, I just had more of these to myself. They are easy to make, (somewhat) healthy, and incredibly delicious. You can pull them together quickly, and I will definitely be making them again. You could certainly add in other nuts, dried fruit, and different kinds of chips to change them up a little --or even another kind of nut butter. They were the perfect combo of salty and sweet, and I'm still enjoying them days later. Keep them in the fridge and you'll have bite-sized treats for days!


no bake peanut butter-chocolate granola balls

1 1/2 cups rolled oats (I used gluten free rolled oats- make sure the bag is marked as such!)
1/2 cup dark chocolate chips
1/3 cup peanut butter chips
1/2 cup toasted coconut
1/2 cup creamy peanut butter
1/2 cup honey
1 tsp cinnamon
1 tsp vanilla extract
before

and after!

Combine all ingredients in a bowl, mixing well with your hands until all ingredients are combined
Chill in your fridge for 30 minutes
Remove from fridge and form into small balls with your hands (they should be around the size of a ping pong ball)
Keep in an airtight container in your fridge and enjoy for days!


Sunday, June 10, 2012

buying and cooking local

If you hadn't noticed by now, I love cooking seasonally. Not only are ingredients fresher, better tasting, and readily available, but by cooking seasonally, you can also do your best to eat local. It can be very hard when eating out, to guarantee that you are eating local. While more and more restaurants these days cook with local ingredients, and adjust their menus for the season, it is still a slow growing trend, even here in New York. Check out the green market website here to learn more about buying and cooking local. You can read all about why buying local is not only awesome, it is delicious, good for you, good for farms, and good for the city. The website elaborates on each reason, but below is their top 10 reasons to buy local food. Definitely check it out, some might surprise you!

10 Reasons to Buy Local Food

1. Local food tastes better
2. Local produce is better for you
3. Local food preserves genetic diversity
4. Local food is safe
5. Local food supports local families
6. Local food builds community
7. Local food preserves open space
8. Local food keeps taxes down
9. Local food benefits the environment and wildlife
10. Local food is an investment in the future


All sorts of yummy foods are in season right now. I promise to have a green market post soon- and, if you live in New York, and you don't shop at the green market, you're missing out! They are in every neighborhood in the city, so check out their website if you're not sure where the closest one to you is. The colors of the veggies and fruits right now are just amazing, and their taste is even better. For example, garlic scapes. If you don't know them, get to know them! They are the curly top of garlic plants, which are just as edible as garlic. They have a slightly milder flavor, almost in between a scallion and garlic.

When one of my wonderful friends came over this week to cook dinner with me, we used some delicious green market veggies, that we had each picked up last weekend. We both love the market, and often run into each other there on Saturdays. We often cook together, and always make delicious dinners. This week's meal was inspired by the market, and brought to you by local farmers. The fresh ingredients, purchased from the market, give the dish amazing flavor and brightness. I promise, you won't be missing your marinara sauce here; this is a different kind of pasta, and it is delicious.

Farmer's Market Summer Pasta

beautiful, just in time for summer.
1 tbsp olive oil
1 medium handful brown rice (or whole wheat) spaghetti
1/2 a shallot, chopped
2 garlic scapes, cut into inch long pieces
1 yellow summer squash, cut into thin strips
3 large carrots, shredded with a vegetable peeler
2 cups of raw kale, cut or torn into bite size pieces
2 large sprigs of Rosemary
1 medium lemon
1/8 cup white wine
Sea salt and pepper to taste


Bring a large pot of water to boil over medium heat on your stove, before adding in the spaghetti
Cook spaghetti until aldente and drain
While your pasta is cooking, heat olive oil in a pan over medium heat
Add in shallots, and cook for a few minutes until they begin to turn translucent
Next, add in the garlic scapes and cook for two minutes before adding the yellow summer squash
Add in the carrot, and last the kale
Remove the leaves of the rosemary from the stem, and add to your pan as well
Add a good splash of white wine to the pan, and the juice of one whole lemon
After the liquid cooks down, add the drained spaghetti to the pot as well
Season the pasta with sea salt and pepper, to taste, and enjoy!

thanks to my favorite farmers


Sunday, April 29, 2012

a crunchy kind of morning

Sometimes, you just really need a good handful of granola. I mean, honestly, it's hard to find someone who doesn't like granola. Its sweet, salty, crunchy and simply delicious. It is one of my favorite breakfasts or mid-morning snacks on the go, and one of the things I really miss now that I am gluten free. One of the things that drives me totally bonkers, is when something unnecessarily contains gluten. It totally kills me when something could be gluten free, but for a silly reason it is not. For example, gluten free oats are just as great as regular oats. Actually, they're not only just as great- they're the SAME! I know, it's hard to believe, but it's true. Good old regular oats contain gluten because of cross-contamination, not because the oats themselves contain gluten (some people with Celiac are also intolerant to gluten free oats). So basically, what I'm saying, is that I could be enjoying delicious Quaker oats and instant oatmeal for my breakfasts, but silly cross-contamination is keeping me back.

All of that being said, it is definitely important to be able to get creative with breakfast when eating gluten free. I used to bring packets of instant oatmeal to work and enjoy them while checking my morning emails, but felt stuck after I recognized I had a gluten intolerance. Gone was the easy convenience of grabbing two packs of instant oatmeal to go in the morning --what's a girl to do?! I soon learned that there were other ways to go about satisfying my morning cravings. I bake muffins, eat gf toast with almond butter, and even have found gluten free oats (thank goodness, I missed my morning oatmeal).

Upon finding gf oats, and realizing that I could use them in gf baking, I had a genius idea. I could make granola!! Over joyed, I began to wrack my brain (and the Internet) for ideas and inspiration for making my granola. I remembered a delicious homemade granola that my boyfriend's mom had made awhile back and asked her for the recipe. With a few tweeks, I was able to make the recipe gluten free, and delicious. This stuff is seriously addicting, not to mention a wonderfully healthy breakfast, or snack any time of the day. My boyfriend eats it by the handful, and I promise, he's a harsh critic. I definitely recommend you make some- it is so easy and so delicious. In an air-tight container, this granola will last at least a week and a half to two weeks. If you like more chunks in your granola, add more of the liquid topping (butter, honey, sugar) when you bake. Definitely get creative with this- different nuts, dried fruit, and even chocolate would be delicious in this recipe!


good morning, granola

Good Morning Granola

2 1/2 cups oats (not quick cooking)
1 cup coconut (raw shredded)
1/3 cup toasted sunflower seeds
1/4 cup toasted sesame seeds
1/3 cup toasted slivered almonds
2 tbsp butter
1/4 cup brown sugar
1/4 tsp nutmeg
1 tsp cinnamon
1/4 cup honey
1 tsp vanilla

pre-baking

getting toasty

golden, crunchy, delicious.
Preheat your oven to 300 degrees
Spread the oats, coconut, sunflower seeds, sesame seeds, and almonds evenly onto a baking dish
Bake the dry ingredients for 20 minutes
In the meantime, over medium-how heat, melt together the butter, brown sugar, nutmeg, cinnamon, and honey, adding the vanilla when the other ingredients have melted together
After 20 minutes of baking the dry ingredients, pull out out the baking dish and turn the oven up to 350 degrees
Pour the wet, melted ingredients over the top of the dry ingredients and stir to combine
Return the granola to the oven and bake for 5 minutes, removing to mix, and returning to the oven
Cook for another 5 minutes, remove to mix, and return to the oven
After a last 5 minutes, remove the granola from the oven and allow to cool fully on the baking sheet before removing and storing in an air tight container
enjoy!!


Monday, April 23, 2012

rainy day food

There is nothing like a rainy day to make you want to stay inside and cook something warm and delicious. After a jump start into summer weather this month, we've been hit recently with some cold and rainy days. Now, I'm definitely a fan of the summer sunshine, but there is something nice about a rainy weekend day that just makes me want to cuddle up with a good book, and a cup of something hot. This past Sunday, I had the pleasure of doing just that. My weeks (and most weekends too) are very busy, so I definitely cherish a day to do nothing more than read, cuddle, blog, and cook.

One of my favorite kitchen tools is my immersion blender. This bad boy is seriously amazing. It is useful for so many things, but one of my favorite things to use it for is making soup. Who ever invented this thing deserves a big thank you. The immersion blender takes the hassle out of blending- it is a stick blender that you can stick right into a pot. It truly takes the mess out of making soup. There is no need to pour the soup into the blender, and back out again- the immersion blender comes to you. Essentially, you can use it to make anything you would use a blender for, but my soup repertoire has definitely been elevated thanks to my blender. I encourage you to get one of these- they're pretty cheap, and wonderfully useful. Any kind of soup you might want to make- butternut squash, carrot ginger, roasted red pepper, cauliflower...the options are endless.

Thanks to a beautiful produce supply provided to me by my parents this weekend (could a girl ask for a better birthday present?), I had some delicious looking broccoli that was calling my name on Sunday. Combined with some every day ingredients I had in my kitchen (and the wonderful skills of my sous chef, my boyfriend), the soup came together deliciously. I paired it with a delicious avocado and tomato quinoa salad. The quinoa provided the perfect base for the creaminess of the avocado and the sweetness of the tomatoes. It was a perfect match with this delicious soup. This meal was the perfect cuddle up meal on a rainy day. I definitely encourage you to check out one of my favorite kitchen tools, and make some delicious soup of your own!


Broccoli Garlic Soup and Avocado Tomato Quinoa Salad

1 tsp olive oil
4 cloves of garlic, diced
1/2 medium-large onion, diced
2 medium heads of broccoli, given a rough chop (stems and florets!)
3 cups vegetable stock
1 cup water (more if needed)
1 tbsp dill
1 tsp bay leaf
1 tsp salt
1/2 tsp pepper
A sprinkle of freshly grated Parmesan cheese

broccoli cooking...

In a large pot, heat the olive oil over medium heat before adding the garlic and onions
Allow the garlic and onions to sweat out, and as they start to become translucent, add the broccoli
Cook the broccoli for 3 minutes before adding 2 cups of stock and 1 cup of water to the pot
Turn the heat down to low, and add the bay, dill, salt, and pepper
Cover  the pot, and cook for about 20 minutes
After 20 minutes, remove the lid and test to see if the broccoli is soft with a fork (make sure both the florets and stems are soft)
Use your immersion blender to blend the large chunks out of the soup, in the pot itself (turn the heat off for this step so it does not bubble up and burn you)
I like my soup thick, but depending on your desired thickness, add in the last cup of stock and cook on medium heat until the soup has reached your desired texture
Spoon into bowls and top with freshly grated parmesan cheese
enjoy!

the delicious end result.


1 avocado
1 1/2 cups grape or cherry tomatoes, halved
1/2 lime
1/2 cup quinoa
1 cup water
1/4 tsp cumin
1/4 tsp garlic powder
1/4 tsp dried basil
salt and pepper to taste
a delicious and classic combo.
Bring water and quinoa to boil over high heat, before covering and turning down to a simmer
Cook your quinoa for 15 minutes or until fluffy
Meanwhile, cut open 1 avocado and dice it into small cubes
Combine the avocado and tomatoes in a bowl
Dress them with the juice of 1/2 a lime and season generously with salt and pepper; toss well
Once your quinoa is fluffy, season it with cumin, garlic powder, basil, salt and pepper
Allow the quinoa to cool. Once it has reached room temperature, combine with the tomato and avocado
enjoy!!
the perfect forkful.

Sunday, April 22, 2012

birthday season

April is full of birthdays. Both my sister and I are born in April, as are a smattering of cousins and friends. For whatever reason, spring time rolls around, and the birthdays just keep coming. Last weekend, I was able to go to Boston, where my sister goes to college, to celebrate her 19th birthday. I had a wonderful weekend, and though I'm usually against buying birthday cakes, I ordered her a delicious cake from Rosies, a local bakery --rather than carrying a cake all the way up to Boston.

This weekend, Friday was my good camp friend's birthday, and Saturday was my college friend's birthday- oh and mine! Saturday my parents came in for the day, and a few of my best friends from home and camp were in to celebrate. I was so lucky to have not one, but two delicious home-made birthday cakes for the day. An orange-almond vanilla cake from my mom, and a chocolate marshmallow cake from my boyfriend. Both were seriously amazing. My entire day was filled with amazing food, lots of sunshine, and a lot of  time spent with my wonderful friends who made the day perfect. Thank you to everyone who helped me celebrate!

Jumping back in time, Friday night I had a delicious birthday dinner at my camp friend's apartment. Her roommate and I made some delicious food- it was a wonderful birthday celebration. We were going with an Italian theme, so I decided it would be a great excuse to try out a new recipe. It was a definite winner. This eggplant dish is easy, but definitely an impressive dish. Just a little (seriously, very little) work goes into this dish, but your friends will love it. You can prep it in advance, and finish cooking it off when you're ready to serve it. It is the perfect pot-luck dish! Happy birthday to all of my spring chickens!!

yum.

Eggplant Rollitini

One large eggplant
1 bag of frozen spinach, thawed and patted try with a towel
1 1/2 cup part-skim ricotta cheese
4 cloves of garlic, minced
1/4 cup chopped basil
salt and pepper to taste
1 egg
2 cups tomato sauce
1/2 cup part-skim mozzarella

baking
filling
rolling
 

Preheat your oven to 350 degrees
Line a baking sheet with tin foil, and spray it with non-stick cooking spray
Cut the eggplant in half, long ways, and then slice it into 1/8th inch thick slices (should be about 8-10 slices)
Lay the eggplant on the prepared sheet and sprinkle with salt
Bake the eggplant for about 10 minutes, flipping the eggplant over half way through (you will know it is done when the eggplant is soft and just starts to turn translucent)
Meanwhile, in a bowl mix the spinach, ricotta, garlic, basil, salt, pepper, and egg
When the eggplant is done, place it in front of you on a cutting board and line the entire slice with a thin layer of the spinach mixture
Once the spinach has been spread out evenly, roll the eggplant around the mixture and place each roll seam-side down a baking dish, sprayed with non-stick cooking stay
Repeat this for each of the eggplant slices, packing the rolls in tightly next to each other in the dish
Cover the rolls with the tomato sauce, and cover the dish with tin foil
Bake the rolls for 20 minutes before removing, sprinkling the top with the mozzarella cheese, and placing it back in the oven, uncovered, for about 10 minutes. Finish the dish off by broiling for about 3-5 minutes until the cheese starts to brown
Remove from the oven and enjoy!

a twist on a classic

I eat a lot of quinoa. I think its a delicious and versatile ingredient to keep around your kitchen. You can dress it up or dress it down, pair it with cheese, herbs, veggies- you name it. While quinoa acts very similarly to a grain, it is actually a seed and it is filled with protein. Plus, it's gluten free. It often makes its way into my weeknight dinners, and tonight was no exception. This is a recipe that I came up with a while ago, and have since reused and revamped it.

Stuffed peppers are a classic dish- but this definitely puts a spin on the old classic. By stuffing the peppers with quinoa rather than meat and rice, the flavor levels are really elevated. I'm a huge fan of Greek food, and this is dish was inspired by my favorite Greek flavors. I definitely encourage you to make this dish for a yummy weeknight meal or to impress your friends. Play around with the ingredients- I promise, it will be delicious. I've added in basil, spinach, pine nuts, almonds, even chick peas into the mix- all work deliciously!


Greek Stuffed Peppers

1/2 cup quinoa
1/2 cup vegetable broth
1/2 cup water
two large bell peppers (yellow, red, or orange)
1/2 cup broccoli florets
1/2 cup mini heirloom tomatoes, quartered
2 tbsp feta cheese
handful fresh chive, chopped
large handful fresh dill, chopped
1/4 tsp cumin
salt and pepper to taste
1 tsp olive oil

pre-stuffing

Preheat your oven to 400 degrees
Bring quinoa, broth, and water to boil in a small pot. Cover the pot and bring down the heat to low, letting the quinoa simmer for about 15 minutes until all of the liquid has been absorbed and the quinoa is fluffy
Once the quinoa is done, season with salt, pepper, cumin, dill, and chive
Mix in the broccoli, tomatoes, and feta cheese
Cut the tops off of the two peppers, and remove the seeds from the inside
Scoop the quinoa mixture into the peppers, packing it in tightly and filling to just above the top of the pepper
Drizzle the tops of the peppers with olive oil, and place them in a baking dish
Fill the dish with about an inch of water and place into the oven
Bake uncovered for 25 minutes, until the tops begin to crisp, and then cover with tin foil and finish baking for another 10 minutes
The peppers will be done when they are soft to the touch (test with a fork)
enjoy!!

beauty.

Tuesday, April 10, 2012

passover bliss

Okay, I know. I'm the crazy girl who actually looks forward to Passover every year. When my sister and I were younger, there was Matzah in our house all year round, because we loved to snack on it (matzah and butter- really what is better than that?). Though our taste buds have grown a bit since then, I still look forward to the holiday every year. The combination of the wonderful Jewish traditions, spending two days with my family and friends, and cooking up a storm with my mom all come together in perfection. Between my mom's amazing cooking, and my dad's witty retelling of the story of Passover, they really know how to throw a Seder (the traditional Jewish meal held on the first two nights of Passover, which is eight days long). My mom's chicken soup with matzah balls just can't be beat, and she's very into making non-traditional passover food as well (this year it was tuna tartar instead of gefilte fish- if you don't know what it is, trust me, you don't want to know). Seder this year was no exception, and everything was truly delicious.

If you hadn't guessed by now, my mom put me in charge of desserts for passover this year. She and I had many a conference call finalizing our menu, and settled on a mere 7 desserts to serve at seder. Fortunately, I had a wonderfully large kitchen to spread my baking wings out in. Going home to cook is one of my absolute favorite things to do. Not only do I have an amazing cooking partner in my mom, but I have an incredibly large, newly renovated, perfectly stocked at all times kitchen to bake in. This is even more important when there are 7 desserts on the menu. To top it off, I was convinced to make my desserts gluten free. You may not know this, but matzah is actually made with wheat, as are all matzah products. Therefore, not all things that are kosher for passover (permitted to eat during the week of passover) are gluten free. Being put on dessert duty when I couldn't use the typical passover flour substitute, matzah cake meal, was somewhat challenging. However, because I was forced to think a little bit outside of the box, I think that my desserts came out amazingly. Getting creative definitely paid off here. Enjoy all of the recipes, which are naturally kosher for passover, but delicious to make all year round. I definitely will not be retiring these until next year.

You'll notice 5 recipes below, and I know, I said 7! The first dessert was a fruit salad (blueberries, strawberries, raspberries, and pineapple) with fresh grated lime zest topping it. I know it sounds crazy and so simple, but the lime zest really made the difference in this salad. I promise to post pictures in the future with the recipe its self, but go and try it. Its delicious. The second recipe was my mom's delicious mandel bread. Its an amazingly delicious mix between a biscotti and a thick chocolate chip cookie, with all of the best parts of both. It's a secret family recipe, but maybe one day soon I'll share it with you. For now, enjoy the five below!!


Pistachio Cookies

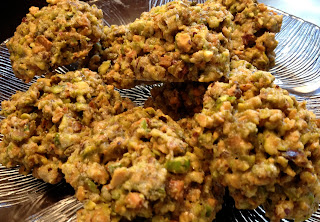
seriously easy, with seriously delicious flavor.


3 cups ground pistachios (use a food processor to chop the pistachios into large "crumbs")
3 egg whites
1 cup of granulated sugar

Preheat your oven to 325 degrees
Mix together the three ingredients until they reach a nice thick, sticky consistency
Refrigerate the batter for 20 minutes, to allow it to come together
Use a spoon to drop the batter into rounded balls onto a lightly greased baking sheet
Cook for about 15 minutes until the tops of the cookies start to turn golden
Move the cookies onto a cooling rack and allow to cool before eating
This recipe will make about two dozen cookies
enjoy!


Passover Brownies

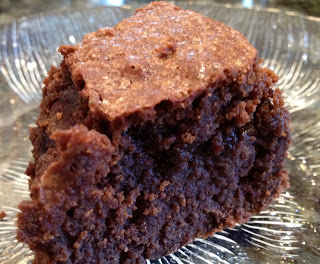
so fudgey, you won't even know its KFP
4 eggs
1 cup canola oil
2 cups granulated sugar
1/2 cup potato starch
1 tsp vanilla extract
1/2 cup cocoa powder
1 bag of semi-sweet or dark chocolate chips

Preheat your oven to 350 degrees
Combine the eggs, oil, and vanilla in a bowl
Once the wet ingredients are combined, add in the sugar, potato starch, and cocoa powder
Finally, mix in the the chocolate chips
Pour batter into a lightly greased 9x9 inch pan
Bake for about 45 minutes or until you test the center with a knife and it comes out clean (you'll want to let them under cook just a little!)
Let cool in the pan and enjoy!


Flourless Chocolate Cake

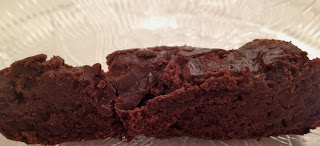
the picture barely does it justice- this is simply divine.

10 oz bittersweet (or semisweet would work here too) chocolate
7 oz unsalted butter
5 large eggs, at room temperature
1 cup of granulated sugar
1 tsp cocoa powder

Preheat your oven to 350 degrees
Chop the chocolate and cube the butter
Place the chocolate and the butter into a double boiler (a glass or metal bowl over a pot with an inch or two of simmering water) and allow to melt, stirring occasionally, until the chocolate mixture is smooth
In a large bowl, mix together the eggs and sugar. Once combined, mix in the chocolate mixture until the batter is smooth
Butter a springform pan and dust it lightly with cocoa powder. A good trick here is to sprinkle the cocoa into the dish and then turn it around tapping the sides lightly so that the cocoa powder spreads out evenly
Pour the batter into the pan, and cover the top of the pan tightly with a sheet of tin foil

Bake the cake for 75 minutes before removing from the large pan with water, taking off the tin foil, and allowing to cool completely on a rack
enjoy with a fresh dollop of whipped cream, or some berries!


Almond Pound Cake

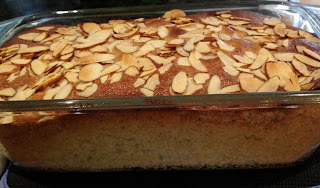
golden, nutty, beautiful.
1 stick butter, softened
1/2 cup cream cheese, softened
3/4 cup granulated sugar
2 tbsp brown sugar
4 eggs
2 tsp vanilla extract
2 cups almond flour (I used Bob's Red Mill brand here)
1 tsp baking powder
1/2 tsp salt
1/4 tsp ground ginger
1/4 tsp ground cardamom
1 tsp cinnamon
1 tbsp sliced almonds, toasted

Preheat your oven to 350 degrees
Mix the butter, cream cheese, granulated sugar, and brown sugar in a large bowl until well mixed and smooth
Add the 4 eggs, one at a time, beating after each additional egg
Add in the vanilla extract and mix well
In a separate bowl, mix together the almond flour, salt, baking powder, ginger, cardamom, and cinnamon
Slowly add the dry ingredients to the wet while continuing to mix as you add
Once combined, pour the batter into a 9x5 inch loaf pan that has been coated with nonstick cooking spray
Sprinkle the top of the cake with the sliced almonds
Bake the cake for 50 minutes, checking to be sure that the center is done before taking it out of the oven
Allow to cool and enjoy!!


Apple Crisp

8 granny smith apples (any tart apple would work here)
3/4 cup almond flour (I used Bob's Red Mill here)
3/4 cup granulated sugar
1/2 tsp salt
1 tsp cinnamon
1/2 tsp nutmeg
8 tsp butter, cold

Preheat your oven to 375 degrees
Peel and core your apples. Cut the apples in half and then into 1 inch slices
Place the apples in the bottom of a baking dish (9x9 is what I used)
In a separate bowl, combine the almond flour, sugar, salt, cinnamon, and nutmeg
Cube the butter into small 1/2 inch cubes and add the butter to the dry ingredients. Mix until the butter has broken up and mixed with the dry ingredients forming small little balls
Pour the topping evenly over the batter
Cover the pan and bake for 1 hour. The top of the crisp should begin to brown, and the apples should be tender
enjoy fresh out of the oven!!
*This one came out of the oven and was gone so quickly, that pictures were not taken- I promise to make it again in the future, i know recipes without pictures are no fun!

Wednesday, April 4, 2012

the wonderful place where I spend my days, and the wonderful people I spend them with...oh, and a delicious recipe

After having graduated from NYU last May, I was very fortunate to have started working almost immediately after graduation. Though perhaps slightly insane for taking a week off between school and the real world, I am so lucky to have ended up working where I do. I work for this awesome place called the Child Mind Institute (check us out online: http://www.childmind.org/). CMI is a non-profit organization, as well as a clinical psychology practice. I work on the clinical side, helping to support our wonderful doctors who work very hard. While things can get kind of crazy sometimes around the office, the plethora of adorable kids that continue to come day after day helps make it better. We seriously have some of the cutest munchkins ever. Anyways, CMI does all sorts of things for all sorts of amazing kids. We promote mental health awareness, as well as help so many children with many varying disorders on a daily basis. Come by some time, I'll give you a tour!

In addition to the wonderful place that I work in, I work with truly wonderful people. I honestly don't know how I got so lucky to work with such nice and caring people. They make going into work that much better, and know how to put a smile on my face. And I, know how to put one on theirs as well (at least through my cooking). As I've mentioned before, my work friends are some of my original taste testers. They are always happy to try any sweet thing that I bring into the office to share (thank goodness or I'd eat it all myself). Last weekend, we all got together to celebrate a few birthdays, and my friend moving on to go to medical school (we miss you!). Everyone brought delicious food, and I of course had to bake something special. I have to say, these blondies are simple and amazingly delicious. You can throw them together in a matter of minutes, and they'll definitely impress your guests. Upon request, mine had dark chocolate chips and peanut butter chips in them, but they seriously take on any chips, nuts, or chunks that you mix in. Make sure you under bake them just a little, and get one fresh out of the oven.

YUM.
Blondies

1 stick of butter, melted
1 cup of brown sugar
1 large egg
1 tsp vanilla
1/2 tsp cinnamon
1/4 tsp salt
1 cup gluten free flour mix (with xanthum gum)
1/2 cup dark chocolate chips
1/2 cup peanut butter chips

Preheat your oven to 350 degrees
Mix the melted butter with the brown sugar on medium until smooth
Beat in the egg and vanilla
Once combined, add in the salt, cinnamon, and flour
Mix in your chips (or whatever else you decide to include)
Pour the batter into an 8x8 inch pan that has been sprayed with non-stick cooking spray, or butter
Bake the blondies for 20 minutes, or until the middle has set
enjoy!
gooey deliciousness.
the before, there was not much of an after...

Wednesday, March 28, 2012

what to do with leftover pumpkin, and other dessert adventures

One of my favorite things about cooking with pumpkin (and buying a big can of pumpkin) is having leftovers to play with. As you'll come to see when the fall rolls around, I love pumpkin and squash, and I love cooking with them. I think pumpkin is such a delicious ingredient, as well as a great one to work with. Pumpkin adds a lot of moistness and flavor to baked goods, and is a great ingredient to add multiple other layers of flavor to. With half a can of pumpkin sitting in my fridge waiting for me, after making the pumpkin bread recipe below, I knew I had to get creative. My boyfriend and his best friend were cooking dinner for a bunch of our friends on Friday night. While the two of them are amazing cooks, they generally stick with the savory. I decided I would take on the sweet, and make dessert for everyone. Often if I bring a dessert to a dinner, I like to have two different desserts. People have different palates, and different likes, and plus- I like to bake, so why wouldn't I make two?

I decided to make a version of a cookie I had made before, and try my hand at a coffee cake as well. Both, I have to say, turned out deliciously. They were a big hit with everyone, and for me as well; I will definitely be making these again. Both I have to say, were made even better by my wonderful gf flour mix (mentioned in the post below). Neither baked any differently, or tasted any differently, than they would if they were made with regular flour- and that is certainly a success. A great website that I draw a lot of inspiration from is Smitten Kitchen, which is where I got the idea for this coffee cake as well (check it out for wonderful recipes, not gf, but easy to adapt)! Definitely try out these recipes, you will not be disappointed.

Pumpkin Oatmeal Chocolate Chip Peanut Butter Chip Cookies

so many delicious flavors, all rolled into one

1 cup canned pumpkin (not pumpkin pie filling!)
3/4 cup granulated sugar
1/4 cup brown sugar
1/2 cup softened, unsalted butter
1 egg, beaten
1 tsp vanilla
1 3/4 cups gf rolled oats
1 1/2 cups gf flour mix (flour+xanthum gum)
1/2 tsp baking soda
1/2 tsp nutmeg
1 tsp cinnamon
1 tsp salt
1 cup bittersweet chocolate chips
1 cup peanut butter chips

Preheat your oven to 375 degrees
In a mixing bowl, sift together the flour, granulated sugar, brown sugar, baking soda, nutmeg, cinnamon, and salt
Add in the butter and mix until the batter starts to crumble
Stir in the egg, vanilla, and pumpkin
Once combined, add the rolled oats, chocolate chips, and peanut butter chips
Mix until just combined
Roll into large balls and place on baking sheets lined with parchment paper- these cookies will not expand a bit, however the size and shape that they are when they go in the oven will remain relatively the same
Bake the cookies for 10 minutes and put on a cooling rack- you might want to snag one of these right out of the oven though!
enjoy!!


Sour Cream Chocolate Chip Coffee Cake

simply delicious.

1/2 cup unsalted butter, at room temperature
1 1/2 cups granulated sugar
3 large eggs, separated
2 tsp vanilla extract
2 cups sour cream (I used low-fat, but either will work)
3 cups gf flour mix (with xanthum gum)
1 tsp baking powder
1 1/2 tsp baking soda
3/4 tsp salt

2 cups dark chocolate chips
1/2 cup granulated sugar
1 tsp cinnamon

Preheat your oven to 350 degrees

In a large mixing bowl, combine the butter and 1 1/2 cups sugar
One at a time, beat in the egg yolks, followed by the vanilla
In a separate bowl, sift together the flour, baking soda, baking powder, and salt
Once combined, alternately add the dry ingredients and sour cream into the butter mixture (starting and ending with dry ingredients)
In a separate bowl, beat the egg whites until they are still, and then fold into the batter
In a small blow, whisk together the sugar and cinnamon for the filling
In a parchment lined 9x9 dish, spread half of the cake batter evenly along the bottom
Sprinkle half of the cinnamon sugar mixture over the batter, and sprinkle with half of the chocolate chips
Repeat these layers again
Once the chocolate chips are sprinkled on, press them lightly into the top of the cake
Bake the cake for 45 minutes
enjoy!

Sunday, March 25, 2012

my new favorite flour, and a secret family recipe


A few weeks ago, one of my mom’s friends (who has been eating gluten free for years) told my mom about her favorite flour blend. For those of you who have tried your hand at gluten free baking, you know that the flour mix is very important. Whether you mix it yourself, or buy it pre-made, most gf flour blends are made of some sort of combo of rice flour, sweet rice flour, potato flour, potato starch, almond flour, xanthum gum, etc. Though many different companies make different flour blends, they can definitely be hit or miss. Some are better when baked into a cake, others when baking bread. Anyways, back to my mom’s weekly mahjong game, her friend told her about a blend that she’s been using for years. It’s called Meisters, and is made by a cute little family in the Midwest. If you live out in Illinois, you can find yourself privy to this wonderful blend at your local health foods store. For those of us though, who live a bit farther away, never fear. You can order off of their website! The 5lb pound of flour is not so expensive, and definitely goes a long way. And I have to say, I’ve now baked with it 4 times, and the results are awesome. The flour really does perfectly mimic regular wheat flour when baked. I’ve made it in brownies, bread, and even cake, and the results are delicious. I highly recommend ordering a bag of this stuff- it will be worth it. If you can’t make the commitment to the 5lb bag, start with something small. But I promise you, if you’re an avid baker like me, this 5lb will inspire you to roll up your sleeves and tie back your apron- you’re going to want the big mama size. Check out their website here- http://www.meistersgf.com/ !

With my new flour ready and waiting to be used in my kitchen, I decided to tackle one of my mom’s greatest recipes of all time. After testing the newbie out, and finding amazing results, I decided that I could take on the holy grail of my mom’s oven, her pumpkin bread. Now, I know what you’re thinking, pumpkin bread? What can be so great. I mean, sure it’s delicious and reminds you of falls as you bite into it, but its nothing so special. Those of you who are thinking this, haven’t been fortunate enough to try my mom’s pumpkin bread. My mom doesn’t bake as much as I do, but those things she make, she makes incredibly well. This pumpkin bread was a standard in the care packages I received at camp and in college, which always put a smile on my face. The bread became so popular, that my mom started baking my friends their own loaves. This bread is sweet without being overly sweet, perfectly cooked, incredibly moist, and full of pumpkin flavor. I’ve missed it so much, that I finally decided I was brave enough to take a gf stab at it. And let me tell you (thank you Meister’s), I was not disappointed. Whether you’re baking gf or not, you must try this recipe. It will seriously change your life. The recipe is easy, and the results delicious. Fortunately, the recipe makes 2 big, or 4 smaller loaves, so sharing won’t be an issue. It also freezes well, so it’s a great make ahead bread. Thanks to my mom for this one- seriously, one of the best of all time.

Pumpkin Bread

 3 ½ cups gf flour mix
2 tsp baking soda
3 cups granulated sugar
1 ½ tsp salt
2 tsp cinnamon
1 tsp nutmeg
1 cup canola oil (or you can sub in 1 cup applesauce for a healthier option)
2/3 cup water
2 cups canned pumpkin (not pumpkin pie filling! Just pumpkin puree)

ready to bake
right from the oven


Preheat your oven to 325 degrees
In a large mixing bowl, sift together flour, baking soda, sugar, slat, cinnamon, and nutmeg
When the dry ingredients are well mixed, add the oil and eggs one at a time with the mixer on. Once incorporated, add the water and pumpkin, and mix well
Be sure that you use a spatula to scrape down the sides and bottom of the bowl, to ensure that everything has been mixed together
Once combined, pour the batter into 2 large (4 small) bread pans, that have been greased lightly with cooking spray
Bake for one hour, or until top starts to brown. Since this bread is thick, be sure to check the center of the cake with a toothpick before taking it out of the oven and letting it rest
You can let it cool inside the pan, and try to resist eating it after it has slightly cooled
Enjoy!!

its just so good.

enjoy!

Tuesday, March 20, 2012

been craving pizza?

Just because I can't eat gluten anymore, does not mean I need to give up pizza. For those of you out there who might be missing that amazingly delicious cheesy first bite of hot pizza, all is not lost. First of all, for those living in New York, there are many yummy delicious places that make gluten free pizza (Those of you who are not in the city- don't be afraid to ask, more places have gf dough these days!). A few of my favorites are from Keste and Slice, however many more are popping up all over the place.

That being said, I also really like making my own pizza. At a delicious local pizza place, Viva, which is across the street from my apartment coincidentally enough, you can not only buy gf pizza, but gf dough as well. They have three different options: chickpea flour dough, cornmeal dough, and brown rice dough. My favorite is the corn meal, which is a bit corny (in a good way), but also tastes similar to regular dough. (In future posts, look out for me being a bit more adventurous and making my own from scratch, but this is pretty yummy for now). Brands that make GF products, such as Bob's Red Mill, also have flour mixes that you can make at home if your local pizza place isn't slinging gf dough these days.

Recently, I've had two double pizza dates with very close friends of mine and my boyfriend. On the first, with one of my old roommates from NYU and her wonderful boyfriend, we made pizza with dough from Viva. On the second, with one of my oldest camp friends (who thank goodness lives in the city now) and her boyfriend, who I love, we got a bit more creative and made a cauliflower crust for our pizza. Both were delicious in their own special, yummy way. I love making pizza with friends- its a great way for everyone to be a little creative, and have fun, while ending up with a delicious outcome. Not a big shocker, but I love lots of herbs and veggies on my pizza. I definitely encourage you to get creative with your pizza, like I did here. Find some good friends, and crank up the oven--it's pizza time.


Summer Squash and Ricotta Salata Pizza & Tomato, Mozzarella, and Herb Pizza


1 large ball of dough, halved (1/2 for this recipe and 1/2 for the recipe below)
1/2 cup tomato sauce
1/2 yellow summer squash, sliced into thin rounds
1/4 yellow pepper, cut into strips
A good sprinkle of rosemary and thyme
1/4 cup ricotta salata cheese
1/4 cup of any good shredded cheese (we used a blend here- asiago, romano, parm, or mozzarella would work!)

pre-oven

ready to eat!

Preheat your oven to 400 degrees
On a cookie sheet that you've sprayed with cooking spray, or other flat baking pan, roll out your dough until it is a 1/4 inch thick
Top dough with tomato sauce spreading around so it forms a thin, even layer on the dough
Sprinkle cheese on top of the sauce
Place squash on top of the dough, and then place the yellow pepper
Sprinkle the rosemary and thyme on top of the veggies
 Put the pizza into the oven for about 10 minutes, depending on how dark you like your crust
Remove from the oven, slice and serve
enjoy!


1 large ball of dough, halved (1/2 for this recipe and 1/2 for the recipe above)
1/2 cup tomato sauce
One large ball of fresh mozzarella cheese, sliced into 1/4 inch thin rounds
two large tomatoes (heirloom or beefsteak work nicely, but whatever you have that is fresh will work here!
1/3 a cup of mushrooms, sliced
Thyme, Rosemary, Basil, Oregano (fresh or dried) to taste
1/4 tsp garlic powder
2 tbsp Parmesan cheese


delicious.
Preheat your oven to 400 degrees
On a cookie sheet that you've sprayed with cooking spray, or other flat baking pan, roll out your dough until it is a 1/4 inch thick
Top dough with tomato sauce spreading around so it forms a thin, even layer on the dough
Sprinkle any fresh herbs and garlic that you like onto the pizza
Lay down your thinly sliced mozzarella
Next, add any veggies that you like. Here, we used fresh tomatoes, sliced, and mushrooms
Top the entire pizza with a sprinkle of Parmesan cheese
Put the pizza into the oven for about 10 minutes, depending on how dark you like your crust
Remove from the oven, slice and serve
enjoy!

Oh, and we made kale salad too


Veggie Lovin' Cauliflower Crust Pizza

1 large head of cauliflower, chopped
2 cups of cheese (we used a yummy Trader Joe's shredded cheese blend)
1 egg
Salt and pepper to taste
A few sprinkles of basil, oregano, thyme, and rosemary (fresh or dried)
1/2 cup tomato sauce
1 zucchini, sliced into rounds
1 cup of mini heirloom or grape tomatoes, halved
1 large roasted red pepper, chopped

ricing!

crust, pre-bake

crust, after baking


veg attack

Preheat your oven to 400 degrees
On your stove, bring one large pot of salted water to boil
Toss in the cauliflower and let it cook until soft (test with a fork, about 8 minutes)
Drain all water from the cauliflower and put into a bowl to cool
Using a food processor or immersion blender, finely chop the cauliflower until a fine consistency ("rice like") is achieved
Mix the egg, cheese, salt, pepper, and spices into the cauliflower
On a well sprayed cooking sheet, spread the cauliflower mixture (it might look like mashed potatoes at this point) out in a thin layer
Bake the crust for about 25 minutes or until it starts to brown
Pull it out and top with sauce, veggies, and cheese
Put the pizza back into the oven and broil for about 5 minutes until the cheese starts to brown
enjoy!

the finished project

To note, this pizza definitely did not keep its pizza consistency so well, but that aside, it was delicious. I would definitely make it again, but perhaps tweak the crust so that it held together better.  I found a ton of recipes online, with lots of great pictures of real pizza-like crust, but we didn't quite get there.

Sunday, March 18, 2012

The great (gluten free) matzah ball challenge

Last weekend, my mom came to visit. I'm very fortunate that my family lives only two hours away from me, and likes to come visit in New York whenever they can. I love spending time with my family, and when they come in for a day, we always have fun. My mom came in to spend the day with me, and with a project in mind. Passover is coming up, and for those of you might not know, on passover Jews eat all kinds of weird food like Matzah. Passover is one of my all time favorite holidays, and I have to say, my mom and I cook a mean seder meal (keep an eye out for a HUGE Passover post at the beginning of April). One of my mom's specialties, that she makes for passover and all year round, is her chicken soup with Matzah balls. Over they years my mom has definitely perfected the taste and texture of these delicious floating dumplings, and everyone loves having her soup as one of the courses at our seder.

This year, my mom is determined to make gluten free matzah balls, for me and my cousin, who also eats gluten free. My mom showed up at my door, shopping bags in hand, and on a mission. We made three different matzah ball recipes and had a taste test. I think that making good matzah balls is hard in general, but good gluten free matzah balls?! Almost impossible. Last year my mom made gf matzah balls from a box mix, and they were pretty disgusting. This year, she's determined to do better. After many hours of mixing, chilling, and cooking, we had a matzah ball taste test to decide which was the best tasting matzah ball. We wanted them to taste like matzah balls and look the part, too. While they were definitely not winners across the board, we found a winner! Enjoy the recipes below, and try them at your own risk. The last recipe is the one that was very yummy, with the most similar flavor and consistency to regular matzah balls. This is the one we'll be making at our seder this year!


Take One

These were much more soup dumplings than matzah balls. If you're looking for balls of mashed potatoes floating in your soup, this recipe is for you. Otherwise, I'd say skip this one.

take one


2 lbs large red potatoes
1 egg
1/4 cup potato starch
2 cups blanched almond flour
Salt and pepper

Bring a large pot of water to boil on the stove, and add the potatoes. Boil the potatoes until they are tender (about 45 minutes) and then drain them
Allow the potatoes to come to room temperature and peel off the skins. Chop the potatoes into large chunks and chill in the fridge until they are cold all the way through
Once cooled, mash the potatoes and get out as many lumps and bumps as possible
Bring another pot of water to boil on your stove
Into the potatoes, mix in the egg, potato starch, almond meal, salt, and pepper
Roll the potato dough into small balls and place them gently into the hot water
The balls will rise to the top of the pot as they cook through
After about 12 minutes, all of the balls should be floating. At this point, remove them from the pot with a slotted spoon and enjoy


Take Two

While this recipe definitely seemed promising, even after adding extra almond flour, the batter almost feel apart. Ultimately the balls just did not come together, and though they cooked better than we thought they would, they were very grainy in texture and did not have great flavor.


take two

4 eggs
2 tsp salt
Pepper to taste
2 cups almond flour

In a bowl, beat the eggs, salt, and pepper for two minutes. Once combined, mix in the almond flour and refrigerate the mixture for 2 hours
Once chilled, bring a large pot of water to boil
Roll the batter into small, 1 inch balls and then drop them into the boiling water
Reduce the heat of the stove, and cover the pot, cooking for 20 minutes
After 20 minutes, take out the balls and enjoy


Take Three

Finally, we got it. While this recipe is close but not perfect, it is tasty, texturally pleasing, and definitely reminds me of Passover. The recipe calls for gluten free matzah, which most grocery stores now carry. The gf matzah is actually delicious, I definitely recommend you buy some! My mom and I will be making these bad boys again for our seder, hopefully you will too! We definitely recommend adding in extra salt, and perhaps some herbs also to elevate the flavor of these.

take three


1 1/2 cup gluten free matzah meal (we used gf matzah crushed very finely, it worked great as a sub!)
4 large eggs, separated
4 tbsp vegetable stock
1 tbsp olive oil
1/2 cup almond flour
salt and pepper

Place egg whites in a mixing bowl and whip until stiff peaks form
In a different bowl, whisk together the egg yolks, stock, and olive oil
Place your matzah sheets in a bag and use a rolling pin to crush to fine crumbs (you could also use a space grinder or food processor that is able to really create a fine crumb)
Fold half of the matzah meal and salt into the egg whites, and then fold in half of the egg yolk mixture. Repeat with the remaining meal and yolks, adding in the almond flour at the end
Refrigerate the batter for 30 minutes
Bring a large pot of water to boil on the stove
Roll the matzah balls into 1 inch balls and drop them into the boiling water
Cover the pot and simmer for 30 minutes before the matzah balls are ready to eat!
enjoy!